Run Linux Ubuntu on Tegra 2 Tablet (nvflash)
by
andrio
url
http://bestandroidinfo.blogspot.com/2011/06/run-linux-ubuntu-on-tegra-2-tablet.html

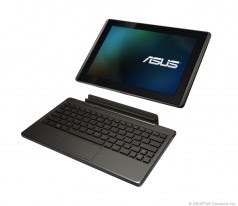
By now, there are a bunch of devices in our beloved site that have gained the ability to run Linux distros thanks to our devs. The latest one to be going down that path is the Asus Transformer. XDA member seshmaru posted a guide that explains how to flash Ubuntu onto Tegra 2 based devices. This is not just running it from an SD card but actually flashing this onto the nvflash of the device, so for those of you who were still wondering what use was the security key, this is one such reason. Keep in mind that this is not complete yet as the tools required to flash anything to nvflash are currently under development. However, if you wanted to have a more robust OS than Android, this is certainly something to keep your eye on. The guide being linked to has been proven to be effective for other devices. Lastly, this guide will run you on installing Karmic Koala, but there are certainly ways to get something a bit newer than this build.
Please leave some feedback or suggestions if you have something to add to the guide.
So as we all know soon we will have the files to access nvflash. This for one will hopefully allow us to install any OS we want.
Here is a guide to flashing ubuntu through nvflash onto a tegra 2 device:
For those of you that are chomping at the bit to get Linux going, I thought I'd provide the procedure we use at ARM to run off-the-shelf Ubuntu Karmic on Tegra 200 by reusing fastboot from the Android SDK. Karmic runs really nicely on Tegra2, even without any acceleration!
I've been using an Ubuntu Karmic PC to do the below:
1) Download or build linux kernel zImage for Tegra
Update: prebuilt kernel for 9.12.9 now on http://www.elinux.org/Tegra2 so you can avoid doing this stage
git clone git://nv-tegra.nvidia.com/linux-2.6.git
cd linux-2.6
git checkout tegra-9.12.7 [note, updated version: tegra-9.12.7 is good]
Use arch/arm/configs/tegra_harmony_gnu_linux_defconfig
Onboard ethernet works with kernels 9.12.4 onwards, but if you want you can enable additional USB network adapters (e.g. I use CONFIG_USB_NET_AX8817X ). [updated]
[note, seems to be a minor compilation issue with tegra-9.12.6 so don't use that initially]
2) Download Android SDK from nVidia
Copy the recently-built zImage into the android_tegra_250_5421622 directory
Connect mini-USB on Tegra to host PC
Create new file 'linux_fastboot_nand.cfg' (contents at bottom of this post) and nvflash script called 'hacked_nvflash_crt_1gb.sh' containing:
pushd `dirname ${0}` ; sudo LD_LIBRARY_PATH=. ./nvflash --bct tegra_250_333MHz_1GB.bct --setbct --bl fastboot.bin --configfile linux_fastboot_nand.cfg --odmdata 0x303d8011 --create --go ; popd
[note, odmdata value updated with 0x30 to get ~650MB RAM]
sh hacked_nvflash_crt_1gb.sh
[actually the zImage is not used at this point, so it doesn't matter what kernel you use]
Monitor on board should display:
"Entering NvFlash recovery mode / Nv3p Server"
"Starting Fastboot USB download protocol"
It is now waiting for a fastboot protocol connection over USB, so you need the fastboot host application
3) Download or build x86 version of fastboot, which is the 2nd stage which writes the actual kernel that will be used
Update: download a prebuilt version from http://www.elinux.org/Tegra2 to avoid this step
git clone git://nv-tegra.nvidia.com/android/platform/build.git build
git clone git://nv-tegra.nvidia.com/android/platform/external/svox.git external/svox
git clone git://nv-tegra.nvidia.com/android/platform/external/zlib.git external/zlib
git clone git://nv-tegra.nvidia.com/android/platform/system/core.git system/core
cd system/core
git checkout tegra-9.12.5 <<< gets correct Tegra version of fastboot host source
cd ../..
make -f build/core/main.mk fastboot <<<< note you may need to comment out $(error stop) to avoid java/javac version test
sudo out/host/linux-x86/bin/fastboot -i 0x955 -p sda1 flash:raw boot PATH_TO_zImage
(replace PATH_TO_zImage with your zImage. Note it is this one that gets used, the other one is just a dummy)
[updated: may need to be root to run fastboot]
Reboot! The linux bootargs come from the fastboot which will need to be hacked if you want to pass anything more complex. The sda1 is a special case in the fastboot code.
Root FS is ext3 USB stick or ext3 USB HDD that appears as sda1
To get the Ubuntu Karmic root FS you can follow Robert Nelson's instructions on: http://www.elinux.org/BeagleBoardUbuntu
To get networking working add to /etc/network/interfaces
auto usb0
iface usb0 inet dhcp
Note the lights don't come on [update: lights do come on with kernel 9.12.7]
Any fixes, please let me know and I'll update this.
IanR
---- cut here linux_fastboot_nand.cfg
[device]
type=nand
instance=0
[partition]
name=BCT
id=2
type=boot_config_table
allocation_policy=sequential
filesystem_type=basic
size=3145728
file_system_attribute=0
partition_attribute=0
allocation_attribute=8
percent_reserved=0
[partition]
name=PT
id=3
type=partition_table
allocation_policy=sequential
filesystem_type=basic
size=4096
file_system_attribute=0
partition_attribute=0
allocation_attribute=8
percent_reserved=0
[partition]
name=EBT
id=4
type=bootloader
allocation_policy=sequential
filesystem_type=basic
size=2097152
file_system_attribute=0
partition_attribute=0
allocation_attribute=8
percent_reserved=0
filename=fastboot.bin
# update information partition
[partition]
name=UIP
id=5
type=data
allocation_policy=sequential
filesystem_type=basic
size=2048
file_system_attribute=0
partition_attribute=0
allocation_attribute=8
percent_reserved=0
# update staging partition
[partition]
name=USP
id=6
type=data
allocation_policy=sequential
filesystem_type=basic
size=6291456
file_system_attribute=0
partition_attribute=0
allocation_attribute=8
percent_reserved=0
[partition]
name=SOS
id=7
type=data
allocation_policy=sequential
filesystem_type=basic
size=5242880
file_system_attribute=0
partition_attribute=0
allocation_attribute=8
percent_reserved=0
[partition]
name=LNX
id=8
type=data
allocation_policy=sequential
filesystem_type=basic
size=8388608
file_system_attribute=0
partition_attribute=0
allocation_attribute=8
percent_reserved=0
[partition]
name=MBR
id=9
type=data
allocation_policy=sequential
filesystem_type=basic
size=1048576
file_system_attribute=0
partition_attribute=0
allocation_attribute=8
percent_reserved=0
[partition]
name=UBN
id=10
type=data
allocation_policy=sequential
filesystem_type=basic
size=8388608
file_system_attribute=0
partition_attribute=0
allocation_attribute=8
percent_reserved=0
filename=zImage
[partition]
name=MPT
id=11
type=data
allocation_policy=sequential
filesystem_type=basic
size=0xFFFFFFFFFFFFFFFF
file_system_attribute=0
partition_attribute=0
allocation_attribute=8
percent_reserved=0
via xda
Disclaimer
This blog's articles taken from many resources on internet and media. If you find your article inside and feel objection, you can send email to me at superbuxmoney@gmail.com


1 comments:
In this code, where should I get the nvflash and tegra_250_333MHz_1GB.bct files?
Leave a Comment